Motorcycle dash cams (also known as motorcycle cameras) are becoming an essential accessory for riders who want to capture their journeys, ensure safety, and have reliable evidence in case of an accident. Installing a motorcycle dash cam can seem daunting, but with the right steps, it can be a straightforward process. In this guide, we’ll walk you through the installation process and some tips for choosing the best dash cam for your ride.
Tools You’ll Need:
- Screwdriver
- Zip ties / Velcro straps
- Electrical tape
- Wire stripper (optional)
- Multimeter (optional)
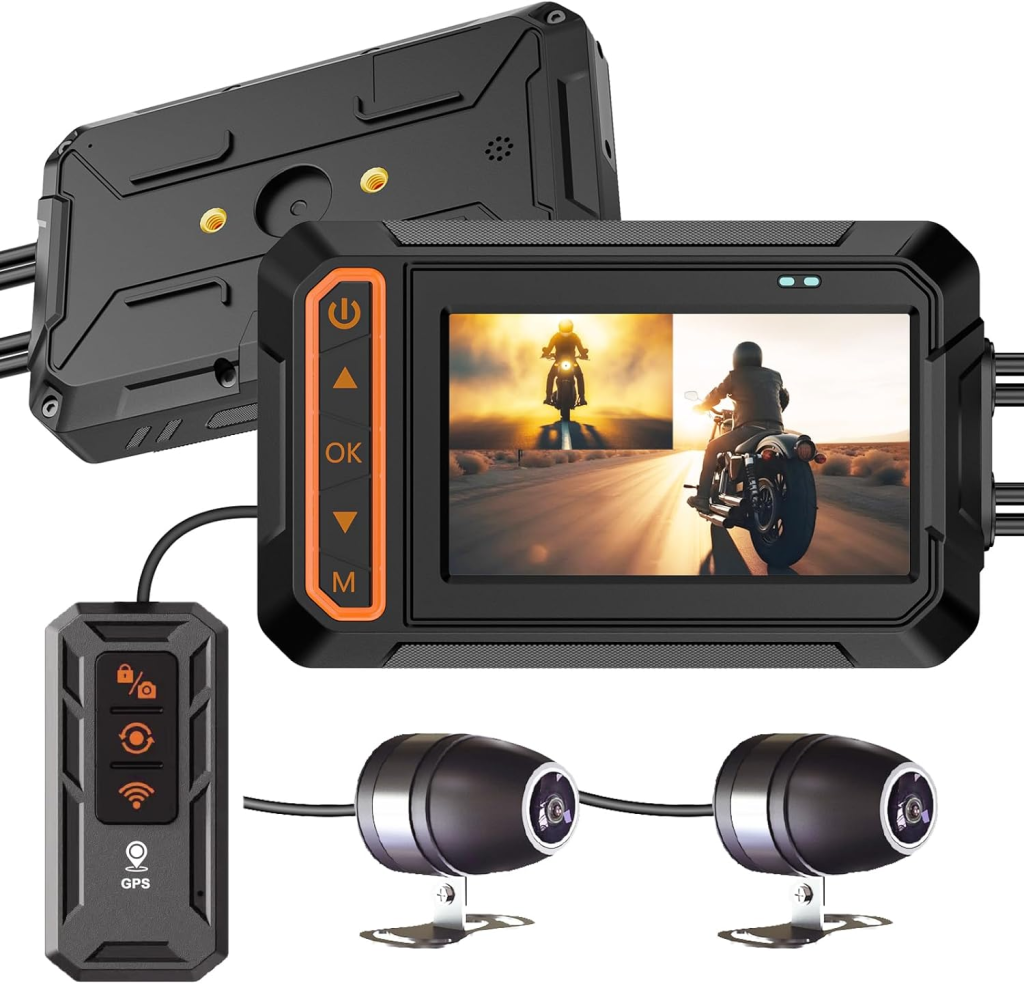
- Motorcycle dash cam kit (main unit, front and rear cameras, power cables, display/screen or remote control)
Step 1: Confirm Installation Locations
1. Front and Rear Cameras:
- Front Camera: Install it on the front fender, near the headlight, or on the rearview mirror mount. Ensure it has an unobstructed view of the road.
- Rear Camera: Typically installed above the license plate or below the taillight, so it captures what’s behind you.
Tip: The cameras should be securely mounted to prevent shaking or vibrations during your ride. Also, angle the cameras slightly down to avoid capturing too much sky.
2. Main Unit (Dash Cam):
- Place the main unit under the seat, in a storage compartment, or in a tank bag. Ensure it’s protected from rain, dust, and direct sunlight.
- Make sure the unit has good airflow for cooling, especially if it’s a high-performance camera.
3. Power Supply Connection:
- We recommend connecting the dash cam to the ignition power (ACC). This ensures the camera powers on when you start the bike and turns off when the engine is off.
- Common power sources include:
- The ignition wire harness
- The fuse box (via an add-a-fuse kit)
- The USB port (for temporary installations)
Step 2: Wiring the System
- Front to Main Unit: Route the wiring from the front camera to the main unit.
- Main Unit to Rear Camera: Similarly, run the cable from the main unit to the rear camera.
- Securing the Cables: Use zip ties to secure the cables along the bike’s frame and inside its body. Make sure the cables don’t interfere with moving parts like the chain or suspension.
- Protect the connectors with electrical tape to make them waterproof and dustproof.
Step 3: Connect Power
- Find the ACC power wire (use a multimeter to check: it should have 12V when the bike is on and no voltage when the bike is off).
- Red wire connects to the ACC positive terminal.
- Black wire connects to the ground (usually the bike frame).
- Some cameras also come with a constant power wire (yellow) for parking mode. You can connect this to the bike’s battery, but be cautious, as it can drain the battery if left for long periods.
Step 4: Test the Dash Cam
Once everything is connected, it’s time to test the system:
- Start the bike and see if the dash cam powers on automatically.
- Check that both the front and rear cameras display clear footage and are correctly positioned.
- Verify that the camera’s remote or buttons work, including functions like locking videos or taking snapshots.
- Record a short video to check for clarity, audio quality, and any interference.
Step 5: Final Adjustments and Tidy Up
- Secure any loose wires using zip ties and electrical tape.
- Ensure the wiring doesn’t interfere with any moving parts like the chain, tires, or suspension.
- If your bike is exposed to rain often, consider using a waterproof case for the main unit.
Tips for a Successful Motorcycle Dash Cam Installation:
- Regularly Check Camera Angles: After installation, check if the camera angles have shifted over time.
- Heat-Resistant Zip Ties: Use high-quality, heat-resistant zip ties, especially if you ride in hot climates.
- Choose a Wi-Fi Enabled Dash Cam: Dash cams with Wi-Fi or app connectivity allow you to adjust the camera angles and review footage easily.
- Location of the Main Unit: Avoid placing the main unit in easily accessible areas (like the fuel tank), as it could be prone to theft or damage.
Why Install a Motorcycle Dash Cam?
Motorcycle dash cams provide crucial safety benefits:
- Accident Evidence: In case of a collision, having a dash cam recording can serve as valuable evidence for insurance claims or legal purposes.
- Insurance Benefits: Some insurance companies offer discounts if you have a dash cam installed.
- Ride Logging: Dash cams allow you to relive your rides and share exciting moments with friends and family.
Final Thoughts
Installing a motorcycle dash cam is an investment in safety and peace of mind. By following this step-by-step guide, you’ll have your dash cam installed and ready to record in no time. Whether you’re commuting to work or going on a long ride, a dash cam is a small device that provides big benefits. Safe riding!
